|
12volt
wiring the camper
my camper
I have a very basic Marlin Camper
Trailer which is a semi off road trailer with an Oztrail12 camper
tent. It came as the trailer, tent, a leg on the back and a spare
wheel. That does not bother me because the tow vehicle I use is a
2001 Commodore so we are not into heavy off roading or going too far
from civilization that we need to take weeks worth of supplies with
us. The only other purchase we made was a Waeco fridge which is
excellent for food. This will fit in the boot of the car but unless
you run a cable from the cigarette lighter to the boot it did not
run. The other problem is that the power turns off once you kill the
accessories, not to mention the whole time you are running the
fridge off the starting battery. The Waeco does fit into the boot,
but you can't open the lid. So this was the start of my next
project.
12volt
project
Like I said my tow vehicle is
nothing more than a Commodore so with a lot of research and planning
I bit the bullet and started to put a battery on the trailer to be
charged by the car while we drive. I also wanted to wire the trailer
so it would be solar ready if I wanted to go that way. A couple of
the ideas I did was on the assumption we would not keep this car
forever and that the next vehicle may have dual batteries.
wire wire
wire????
This was a very confusing subject.
I know that thicker is better. I know that the wire size is very
important in having the system work. All the information on the net
basically confused the hell out of me. Then you talk to the auto
electricians they have suggested using 6mm auto cable.
Now I am not going to go into the debate on auto cable sizes in
comparison to cross section measurements etc. I chose the size of my
cable based on a couple of factors. Accessibility. I live at
Armidale in NSW so I went around all the stores and was about to
purchase on-line until I went to a local lighting store. He had lots
of this cable that not only got what I wanted to start the project,
if I wanted more it was not too far to go.
The second reason for this cable
was Application. Yes it had to put power in the battery, but
also where I was putting the cable needed to be a bit smaller than
the recommended sizes as it needed to go between the boot lid and
the car body when in use.
The local light shop stocked twin sheaf auto cable for 12volt garden
lighting. I don't have callipers but using a rule on the end of the
cable including sheaf it looks like 4mm across (not including the
outer sheaf) and the actual wire strands look like they are 3mm
across. Yes that is not great but if it trickles into the battery
that will be fine.
One of the bonuses for this cable is that it's twin core so I ran
the earth connection directly from the battery of the car.
anderson
plugs
Believe it or not I picked up ten
genuine 50 amp Anderson plugs off Ebay for $30 to $40, but when it
came to connecting them to the cable what to do? Internet research
via Google brought up Youtube movies about soldering them to the
cable. So I bought a roll of solder and using a gas stove and a pair
of pliers heated the ends, filled with solder and inserted the wire.
the car
I found info of another persons
project who wired a computer in the boot for his commodore
http://palgn.com.au/viewtopic.php?p=846521 This was a
basic dual battery system, but this gave me the path for the wire to
go through the car.
Following this plan I ran cable from the battery into the inside of
the car, down the side of the car and into the boot putting an
Anderson plug on the end. I put a circuit breaker on this line near
the battery but I did not put a voltage sensing relay/solenoid on
this line for a couple of reasons. One is that I could not justify
the cost of one (until I get a flat battery) because the camper is
only on the car a few times a year, not a permanent dual battery
system. The second reason is that I wanted constant power in the
boot so that I could plug the Waeco fridge in if I wanted to.
The lights harness for the trailer sits in the boot and hangs out
when towing the trailer. I laid the power cable in the boot like the
trailer lights wiring harness & will hang out to hook into the
trailer plug. This was one of the reasons for the size of the wire
as it had to fit out between the car and the boot lid.

the trailer
The front of the trailer has an Anderson plug that hooks into the
car with the wiring going down the right hand side of the A frame to
a junction box near the battery. The junction box is where I looked
at controlling the charge because I did not put a voltage sensitive
relay on the car. I also wanted to make it easy if we bought a
vehicle which had dual batteries also and ready for solar.
For this I installed two battery isolation switches in the junction
box. The accessories pull their power from the middle of the two
switches allowing me to pull my accessories power from either the
car supply or from the trailer battery.
The junction box has two Anderson plugs installed on the bottom. One
of the Anderson's is for the trailers battery so that it is easy to
install or remove from the trailer and the other one is for a solar
panel.

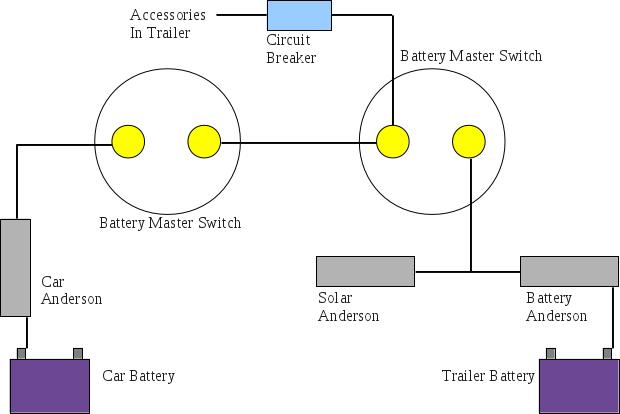
Here is the circuit diagram for the
trailer and the control box. The only item missing from this circuit
diagram is an extra circuit breaker that I installed near the car
battery for the line to the boot.

So the basics of this is simple. If the switch on the car side is
on, the accessories pull from the car battery. If the switch on the
trailer battery side is on, the accessories pull from the trailer
battery. If both switches are on the accessories are running off
both the batteries or the trailer battery is charging from the car.
The solar Anderson is connected to the battery Anderson plug so even
if trailer accessories are using the car supply and not the trailer
battery, the solar panel will still charge the camper battery. It
could also be used for a second battery in the trailer if I wanted
to.
I know that our current tow vehicle is not setup with a dual battery
so I cannot see us using the car side battery master switch for
anything other than isolating the car battery when the car is not
running, Typical idiot switch. But having the switch there
does make the trailer ready if the next vehicle has a dual battery
so we could use either battery, one at a time.
extension
cord
I made a six metre extension cord
using the same wire I used to wire the camper and the car. I fitted
this with an Anderson plug at each end so that if the sun was at the
wrong end of the campsite, I can put the solar panel at the other
end.
charging
For a little test of the car to
camper charging, I hooked the car up to the front of the camper
using the extension cord and took a few voltages. Just for the
experiment I plugged the Waeco into the trailer adding a little
load. So not only is the wire too small as suggested by the various
readings on the net, the cord was six metres longer than what it is
going to be when we are towing the vehicle. Here are the results.
Resting vehicle voltage 12.4V
Trailer voltage 12.0V
Running vehicle voltage 14.3V
Charging trailer voltage 12.8V and climbing
After 5 minutes of charging the battery was reading 13.6V
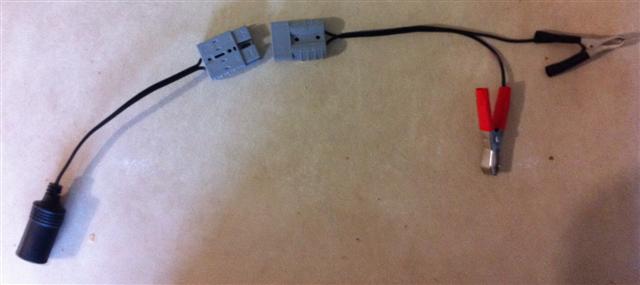
the boot
A while ago we went camping without
the trailer using a battery and a cigarette lighter to alligator
clips we bought from Repco. I cut it in half and put Anderson's on
each end. This gave me two pieces that could be joined together and
make the original alligator to a cigarette lighter connection.
Splitting them in half allows me to use the cigarette lighter side
in the boot of the car if it is connected it to the Anderson in the
boot (Remember that it is on constant power). The other half with
alligator clips allows me to connect a different battery or connect
the solar panel to the car battery.

solar
Again to the internet for a lot of
research with my budget in mind. After reading reviews on websites I
decided I was not going to buy a panel off Ebay. I started looking
at Jaycar and other businesses, tossing up one panel V's two in a
bag etc.
On the off chance I went down to the local solar shop here in
Armidale to get a quote. He suggested a 85 Watt panel and regulator
for the same price as the 80 Watt Jaycar panel. More consideration
but I ended up purchasing the single 85 Watt Suntech panel and
regulator from Jaycar to add to the kit.
thanks to Kelvin
Magner for sharing this thoughts
november 2011
|