|
Holspeed
Mk11
a homebuilt camper - on a budget
Like many camper trailer owners we
started out tenting. After a number of successive wet camping trips
late in 2007 our 10 year old tent was showing its age and I figured
there must be a better way to stay dry but still retain the camping
atmosphere. Friends of ours had a camper trailer and after checking
out their setup I concluded this was the way to go.
As the subtitle says this was to be a budget build - sourcing
well priced materials, utilising what hardware I already had, and
doing as much of the work as possible myself.
Like a
number of
CamperTrailers members have done I simply intended to
purchase a complete tent top off the internet and bolt it to our old box
trailer. I looked at what the Chinese tents were going for on eBay
and figured I should be able to get one at auction for less than
$1500 including delivery (we are 450km from the nearest capital), add a few hundred to modify the trailer and fit a kitchen.
It
looked like we could do it for well under the (theoretical) $2000
budget.
the
trailer
Some
years ago I obtained, quite cheaply, a second hand 7'x5' box
trailer. The floor and sides were rusted out but the chassis, axle
and spring setup were still good. I lopped everything off level with
the chassis and did a contra deal with a local fabricator to add
350mm high front and side frames, fit a jockey wheel & new 50mm ball
coupling and make up a proper tail gate. The original mudguards were
passable and re-used. The new floor and sides were simply treated
pine planks screwed to the chassis and framework. The rusty 13 inch
rims were replaced with much better 14 inch items. In this form the
trailer served admirably for the next 10 years behind my work van,
carting most anything you could think of. Due to a change of
employment the trailer hadn't been used much in the last few years
and so became a perfect candidate for a camper trailer project!
A visit to the local steel merchant saw me stocked with
various bits of RHS, angle and flat sections. I dragged out the old
stick welder and after much practice extended the sides and tail
gate by 200mm, giving enough height to slide our big icebox
underneath. I converted the fixed front into a drop-down gate. The
old mudguards were discarded and I had some 2mm sheet bent up for
new ones. They came as 2.4m long channels that I had to cut, bend
and weld together. Brackets (4 each side) welded onto the chassis
rails at right angles support the guards. There is a 5mm gap between
the guards and chassis for drainage. The original tail light mounts
were re-used as they are very solid and protect the lights well.
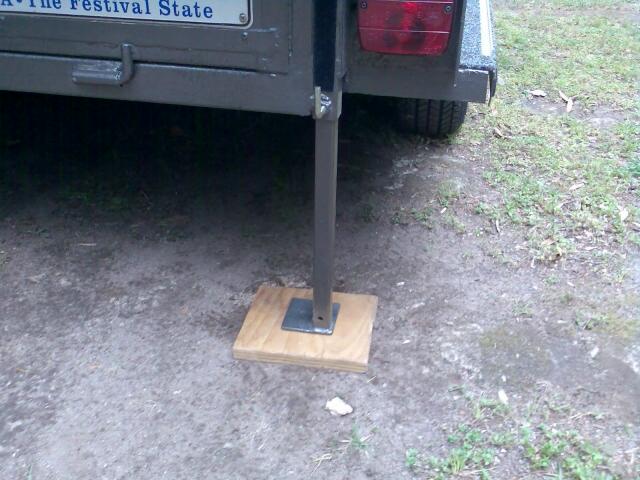
I made up adjustable stabilising legs for the rear of the trailer
using 30x30mm RHS. A hole drilled near the bottom with a nut welded
over it allows a bolt to tighten up on the 25mm leg inside. A 75mm
square plate is welded on the bottom of the leg. Plastic caps in top
of the outer tubes stops them filling with water.
As my tow car is much lower than the old work van, the trailer sat
at an odd angle. I purchased some steel bar and made up blocks to
fit between the axle and springs, this had the effect of lowering
the trailer body 40mm and levelled things nicely – it will never be
an off-road trailer, but then neither is my car!
While not conventionally used in trailers, timber is cheaper and
lighter than steel sheet and for me at least is much easier to
work with. I purchased some sheets of 17mm CD plywood for the floor
and sides; these were sealed and painted prior to fitting. I choose
Charcoal hammer finish (White Knight brand from Bunnings) on the
outside as it covers a multitude of sins and found some Botanic
Green in the shed for the inside. I did try spray painting the
hammer finish but my little compressor didn't like it so I ended up
hand brushing it. I found if you mix in some turps, the paint tends
to spread more easily and brush marks don't show up as much.
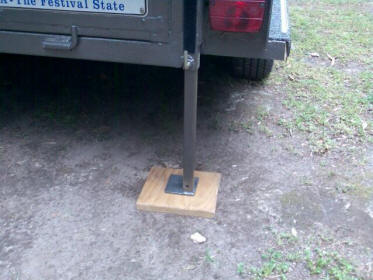
drop down
stabilising leg |
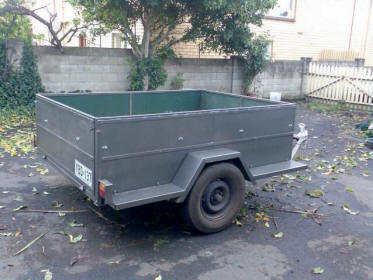
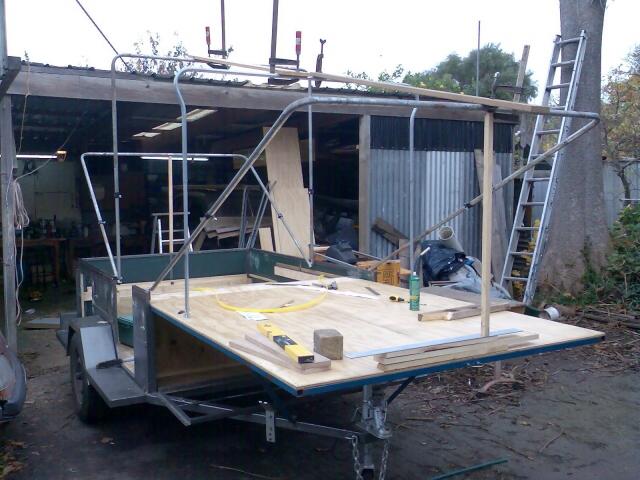
the trailer - ready
for a roof |
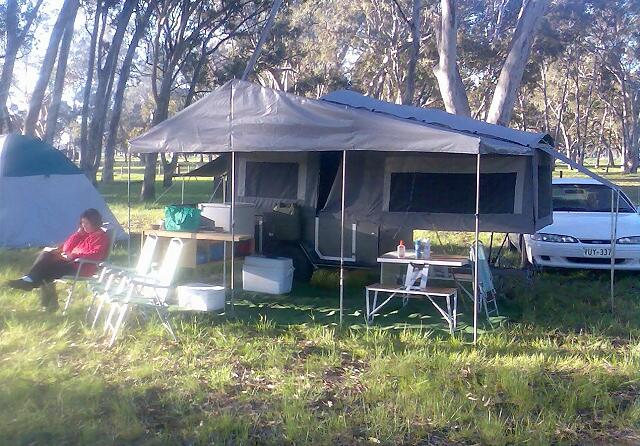
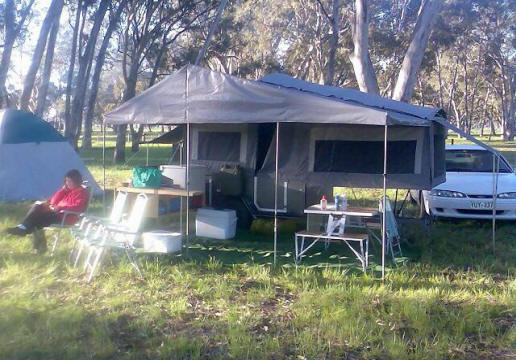
mark1 - the prototype
Over our
years of camping, along with lots of poles, ropes, pegs, etc, we had
managed to amass a few heavy duty silver/green tarps and so while
saving for the tent top I got clever and made a mock-up of a
standard soft floor side fold tent. Using some donated poles from an
old cabin tent I fabricated bows and mounted them to a bed base made
of second-hand chipboard. The wife’s sewing machine then got a
workout sewing up the tarps to make the tent section. Polyester
upholstery thread (from Spotlight) was used to sew it up and the joins
covered with waterproof tape – though we found out later that the
tape wasn't actually waterproof!
I also
made a kitchen box from a sheet of 12mm CD ply to slide in beside
the ice box. Apart from new spreader bars to support the annexe area
we didn't have to buy anything else. In keeping with the camper
trailer look I
fabricated holders for the 4kg gas bottle, battery box and jerry can
out of scrap steel and bolted them to sides of the trailer.
The first
outing was Easter last year (2008), everything worked as intended
(it didn't rain) and we got a number of favourable comments about
its suitability.

Mk1 at Jackass Fern Gully
|
Having been reasonably successful at sewing the prototype I
started looking at the cost of actually making our own canvas top.
After eliminating cheap Chinese canvas from the equation (unknown
quality and importing small quantities is cost prohibitive) we
looked at the Australian stuff. There appears to be only a few
Aussie manufacturers of waterproofed canvas suitable for camper
trailers. Wax Converters http://waxcon.com.au
was
probably the most popular brand. I looked at samples from both WC
and Defab http://www.defab.com.au - the quality appears to be
same, the specs are very similar and both guarantee their products,
however, based on quotes received from a number of places, Defab
canvas is about 2/3 the price of the comparable WC product. Being a
budget build, naturally we'd go with the lower cost. Doing some
rough sums showed that we could probably make a top from Aussie
canvas cheaper than a Chinese version could be had from eBay, not a
huge saving but justified looking at it further. Plus, I just love
making my own stuff. I would still have to get hold of an industrial
sewing machine though as the wife’s little Bernina wasn't going to
cut it.
As luck would have it I was speaking to a friend on another
matter and happened to mention what we had in mind - “I have an
industrial sewer if you want to use it”, it was music to my ears.
The proviso was that the machine had to be stored and used inside
the house rather than in a possibly damp environment like my shed
(wife was not amused). I would appreciate being inside though as it
would be the middle of winter, the downside that there wasn't much
room to work in.
After using the prototype again at the CamperTrailers Group Jackass Fern Gully
meet in April (it was wet) I had a rethink. As our 2 older kids are
now away at Uni there are usually only 2 or 3 of us camping, with a
soft floor camper trailer the wife and I would have the luxury of the high-rise
bed but our youngest would still get the floor. A 3 berth camper
trailer was the
answer, but without breaking the budget. If the other kids were home
and wanted to come camping then there's always the tents.
a new
design
The trick was to come up with a way that
opened up the trailer allowing access to a second bed inside - this
meant the main bed had to flip or slide out. A double bed mattress
is a little smaller than the 7' x 5' I had to work with so either
way would be OK. One thing I decided was that the main bed had to
finish over the drawbar when opened as this is really a dead area on
a trailer and supporting the bed base off the drawbar is much easier
than one coming out from the side or back.
I think I over engineered the bed base design though. With a 25mm
square RHS frame and 12mm CD ply top I calculated it would weight
nearly 40kg - without a mattress. At over 2m long I don't think it
would have been manageable in an end flip configuration. So, a slide
out it had to be.
Another constraint I placed upon the design was the packed height of
the trailer, an issue found with the Mk1 – with 2 mattresses and a
table on top it was too high . I hate not being able to see over
what I'm towing (which is why we will probably never have a
caravan). It meant lowering the bed into the trailer, but this was a
good thing as the tent could fold inside the trailer and nothing
would move around whilst travelling.
A downside to dropping the bed meant that our big icebox would no
longer fit underneath. We had smaller one though and would became
the gauge to set the height of the bed base. My beer would have to
go in an esky instead.
The bonus of this camper trailer design is that less canvas is required than a
normal soft floor, it's not as long or as deep and although a little
higher, the bottom of the walls start almost a metre from the
ground.
It was at this point that I decided to go for it and make my
own.
A great tool I found was to draw everything out on graph
paper as it allows you to do scale measurements and see where
everything fits. Rather than buying graph paper though I found a
website that allows you to print your own -
http://incompetech.com/graphpaper/
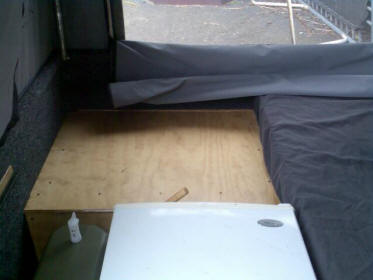
the bed
From our savings, the steel and timber was
purchased for the bed base. The front gate was removed and a
horizontal support bar welded across the opening. The rear gate,
which no longer needed to be opened, was bolted and sealed up.
The frame for the bed base is rather solid, we are not heavy people
but I opted to overdo it a bit so the thing wouldn't sag. To carry
the weight I found some 30mm wide castor wheels at Bunnings and bent
up steel brackets to support them. Originally there were 3 down each
side but I soon realised that the ones above the single bed would
protrude too far into the trailer and be a hazard. The design was
changed to just one set of wheels at the front and plastic strips
mounted onto timber battens fixed along the sides of the trailer.
While not as smooth as using all wheels, the bed slides in/out quite
easily with silicon spray on the strips. To stop the bed tipping
over when pulled out more than halfway I mounted a pair of smaller,
sliding door wheels (Bunnings again) above the bed board, about
250mm behind the lower ones. A piece of plate screwed to the back
edge of the bed board stops it from pulling right out. To lock the
bed in place when both extended and retracted I fitted a small angle
on either side of the trailer, just above the board - 1/4” pins just
drop through them and into corresponding holes in the bed board. I
hadn't finalised the front bed supports at that stage as I was in
two minds whether to extend the existing 1200mm long drawbar.

wheel mounting
|
rolling bed base |
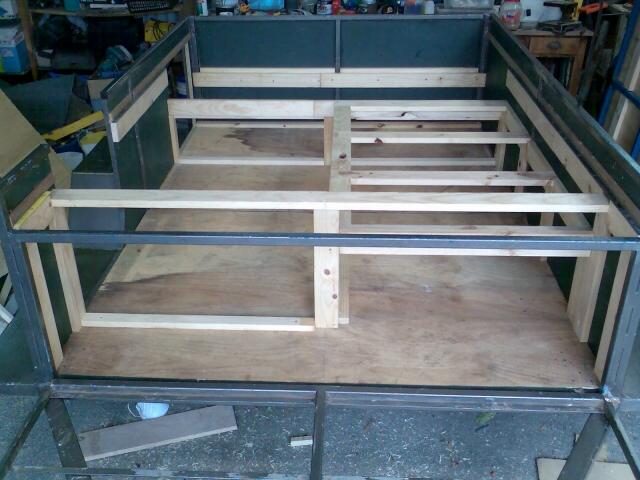
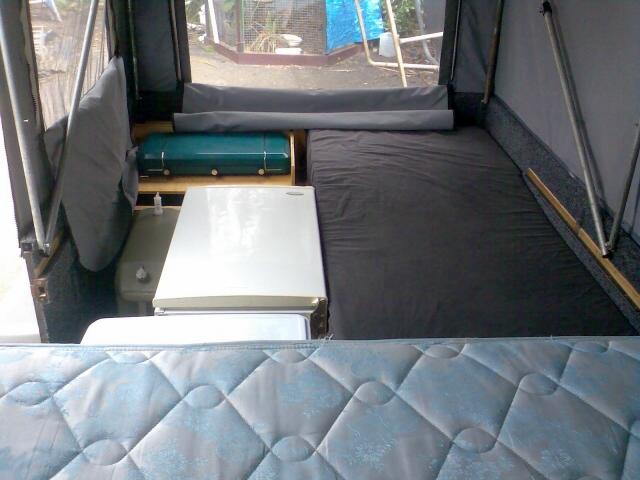
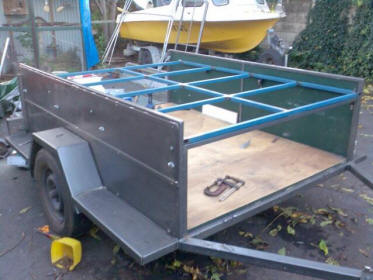
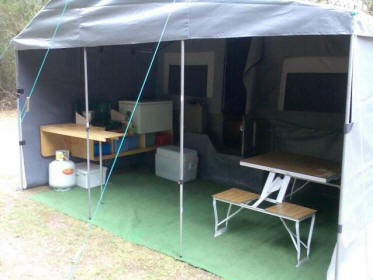
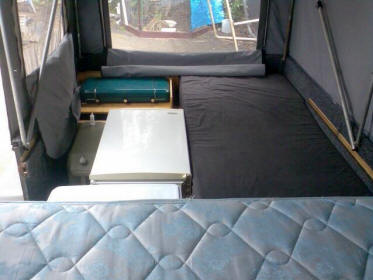
inside
The internal design called for a
single bed down one side of the trailer with lift out panels to
access storage underneath. I wanted as much available space in the
slide out kitchen box to store all the cooking gear and dry food,
with room on top for the icebox. This was achieved by using the full
width of the trailer and having the lower end slide under the bed
when packed away. When pulled out, a ply panel (stored under the
single mattress) converts the area normally occupied by the stove
section into a seat/side table.
300mm of the bed board remains in the trailer when extended, with
the area underneath serving as a front locker for the electrical,
gas bottle, pole carrier, etc, and is accessed via the drop down
front gate. On the same side as the kitchen slides from, a 500mm
wide door was cut out, starting just behind the front locker.
For the internal framing (bed, locker, etc) I used 19mm x70mm pine –
something I already had as it was left over from an off-cut pack of
timber purchased cheaply some time ago (a benefit of living in a
pine plantation growing and processing region). New 12mm CD plywood
was used for the panelling and looks good with a couple of coats of
varnish.
I ended up lining the walls, floor and inside the front locker in
marine carpet, not something that was budgeted for, but happened to
be on sale at Bunnings at the right time. Looks much better than
painted timber I must say.
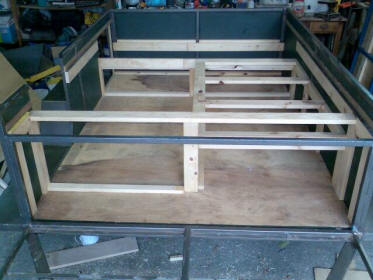
internal framework ready for panelling
|
the bows
- the things that hold the roof up
I started with the traditional 3 bow design
which simply folds out from the side – normally no adjustment is
required once erect but the end walls are angled in at the top.
However, because our tent had to fold out lengthways it would be
over 2m between each bow. I felt the span would be too great and
cause the canvas to sag unduly, so opted for a 4 bow arrangement.
Much measuring, drawing and re-drawing was done to get the bow pivot
position and action right and in the end was a bit of a compromise.
Both the 3rd & 4th bows have to be extended and 2nd has to be raised
from the bed base once the tent is unfolded, however, it adds little
time to the setup and the end walls finish vertical giving the
impression of more internal space.
I had intended to have new bows bent up to support the nice new
canvas but saved some money, had just one made and rehashed the 3
from the prototype. I should give them a coat of paint though as
they do look a little rough.
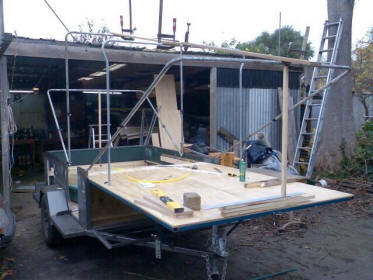
aligning the bows to measure up for the canvas |
the
drawbar
One Thursday night on the
CamperTrailers Group live chat I showed
members a photo of how things were progressing with the build.
Whilst voicing approval for the work completed, the majority said
they had an issue with the strength of the current drawbar setup.
Given that it was simply butt welded onto the chassis rails I had to
agree having had the same thoughts myself for some time.
Although I had been OK welding the framework on the trailer, this
was a job best left to the experts. Following advice from my local
welder some 75mm x 50mm x 4mm RHS was sourced and a visit scheduled.
After cutting off the old drawbar, the trailer was flipped upside
down. A few zips with the MIG and it was almost 600mm longer, and a
heck of a lot stronger – pity my pocket was now much lighter..
Refitting the brackets for the overrider bars (required on my tow
car) to the extended drawbar gave me a mounting point for the bed
supports. One end of the 20x20mm support fits over the bracket, the
other end slips over a bolt through the bed base side rail.
the tent
Instead of the traditional sail
track method of attaching the tent I opted to use hook & loop
(Velcro). This way meant it could be removed and refitted easily and
potentially any slack in the canvas could be adjusted out.
I found a canvas supplier who is happy to sell direct to the public
– Mick at Raymond Traders in Adelaide
http://raymondtraders.com
After much drawing and measuring it was time to place an order. I
looked at what other tent makers use and chose 14oz canvas for the
roof and 11oz for the walls, in grey toning. Along with the canvas,
I also ordered 25m rolls of 50mm wide hook & loop (Velcro is GREAT).
We got the expensive sticky back stuff but could have saved quite a
bit as contact adhesive works just as well (somewhat messier
though).
Also purchased was some “midgee proof” insect screening for the
windows, ½ dozen No.10 chunky zips for the windows, door and annex,
and a spool of light grey M12 poly/cotton thread. For the annex roof
& end walls we went with Duratuff by Defab, a 14oz PVC material.
While PVC doesn't breath as canvas does I never intend to close it
in at the front so condensation shouldn't be an issue, plus, the
cost is somewhat less than canvas – about 75% cheaper actually!
I collected the sewing machine and started by practicing on some
scrap canvas. I had left the machine set as I got it but found that
when sewing the heavier canvas it was dropping stitches. A quick
call was made to a sewing machine mechanic friend to see if he could
point me in the right direction. After an inspection it was found
that the machine wasn't actually as heavy duty as first thought. It
would do the job, but with compromises.
Changing to a larger needle virtually stopped the dropping stitches
issue, but the machine wasn't capable of handling the heavy thread I
had purchased and was advised to stay with the thinner M25 that came
with it – a pity it was black thread but I wanted to get started..
In hindsight I should have kerbed my eagerness and ordered the
smaller thread in grey. Sewing straight is not easy on large pieces
of canvas and dark stitching on light coloured material stands out
like the proverbial..
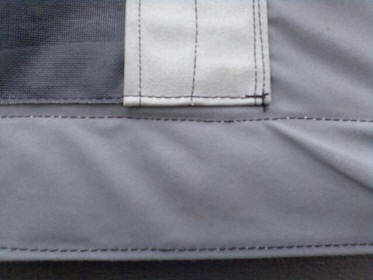
not the neatest sewing |
If you ever visit a canvas shop
you will notice they have large tables to lay the pieces out on
while sewing. Having to make do with a 1200mm by 900m dining room
table made the job very awkward indeed, with a lot of stopping and
starting to reposition the work. I also found when sewing different
thickness and/or dissimilar materials together that one piece would
often pucker (or the other would stretch) meaning the pieces you cut
exactly right could end up the wrong length. Both these conditions
(in my case at least) also tended to create some ordinary looking
stitching.
Perhaps I'm making excuses but I know that a larger work area, with
big tables, and a more capable machine with a “walking foot” would
have certainly made the finished job much better.

getting there
|
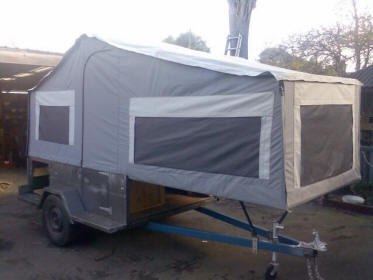
tent section finished |
One thing I wouldn't attempt
again is to try and get big chunky zips to go around corners – they
are a pain in the you know what. Maybe there is a trick to it but I
had great difficulty sewing them in, plus you need to use extra wide
strips of canvas to cover the curved zip on the outside. Far easier
would have been to use a zip either side and simply Velcro the top
(or bottom on a door) closed.
As a consequence of having to use a large needle to sew the heavy
canvas meant that a good sized stitch hole was left behind. Normally
this would be almost filled with thread and when conditioned (the
method of wetting/drying to swell the thread and canvas) would
completely close up leaving a water tight seal. Because I had used
the thinner thread this wasn't the case, even after repeated
conditioning it still had some leaks – mainly where the PVC was sewn
directly to the canvas (I had sewn Velcro covered PVC strips to the
roof to secure the bows in place when erected).
After some research I found you could get a wax type sealer in stick
form which you simply rub into the seams, but none of the
camping/disposals stores had any. They all offered me a liquid
sealer (smells like plastic model glue), and while it's probably
good stuff on a nylon tent I wasn't prepared to find out what it did
to new waterproofed canvas. I ended up finding a stick at K-Mart
whilst looking at other stuff – a good thing too as I almost ordered
some online, at double the going rate... Happy to say that it works
and things are nice and dry inside now.
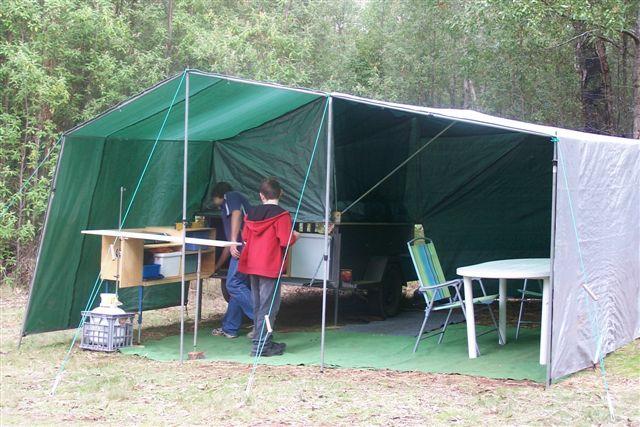
annexe &
other bits
I opted to use heavy PVC for the
annexe as it is quite cheap, making it from canvas would have added
another $350 to the cost. I bought enough PVC for the annexe, 2 side
walls, shade awnings for the tent end windows, a full length skirt
that velcros onto the side of the trailer, and a travel cover.
PVC is not the easiest stuff to sew and instead of slipping through
the sewing machine it would “stick” to the bottom plate (sorry I
don’t know the technical term) – I found occasional applications of
talcum powder made it much easier though.
Because I’d also used the same sized needles as the canvas, the
stitching holes were quite pronounced and were sure to leak. I
bought some of the liquid sealer mentioned above and ran that along
the seams. It certainly works although there are a couple of spots
which drip in heavy rain – another application should fix that.
annex, side walls and skirt
|
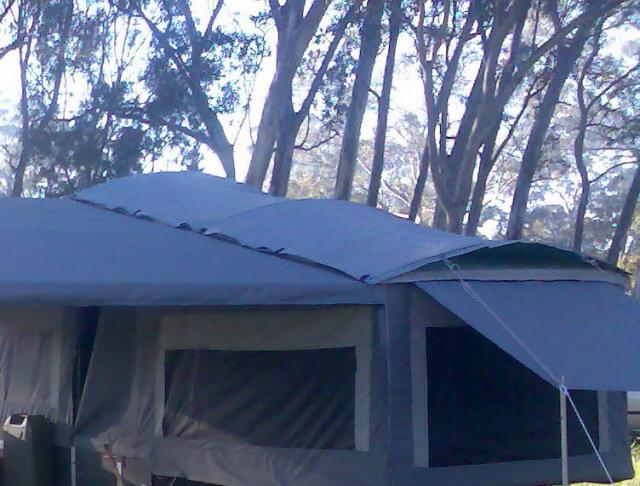
some
extra protection
I had always intended to fashion up a tropical
style roof, but was to come later. However, due to the leaking
canvas issue, I thought it wise to make one now – just in case..
A tropical roof serves several purposes; it protects the overhead
canvas from marking and staining, offers extra protection from heavy
downpours and most importantly, is an insulator against heat and
cold – to be efficient there needs to be a reasonable air gap
between it and the canvas though.
I had some fibreglass poles from an old 2-man dome tent, ideal for
roof supports. There was just enough to make 4 equal length rods, a
bit wider than the tent. I sewed small pockets on the edge of the
roof canvas in line with each bow, then, by bending the rods slipped
the ends of each into the corresponding pockets to form 100mm high
domes. Having an abundance of silver tarp left over from the
prototype made it an easy choice as the roof covering. With the tarp
material cut over length I formed tubes on the underside in which to
slide the fibreglass rods through. In good conditions the tension on
the rods is enough to keep the roof in place but I added Velcro tabs
around the outer edges to hold it down in rougher weather. Thin guy
ropes at either end allow it to be tensioned lengthways.
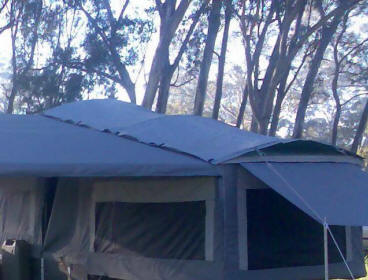
tropical roof
|
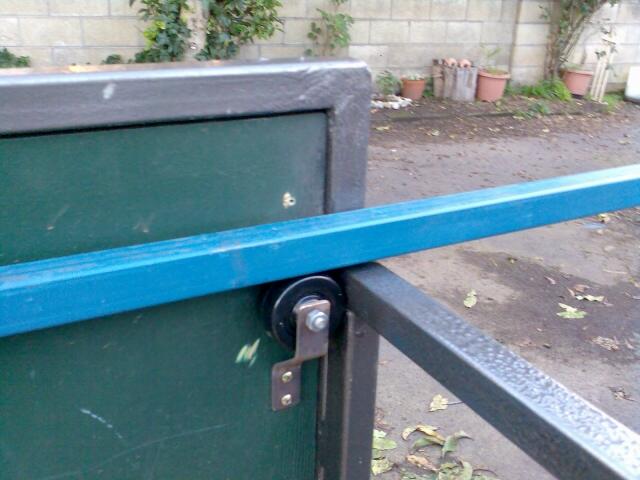
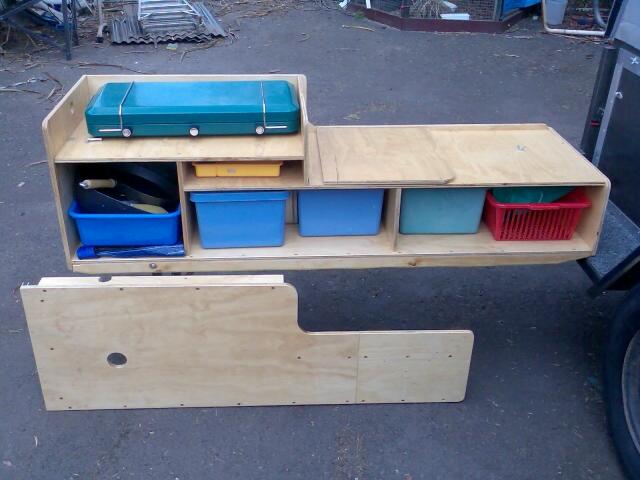
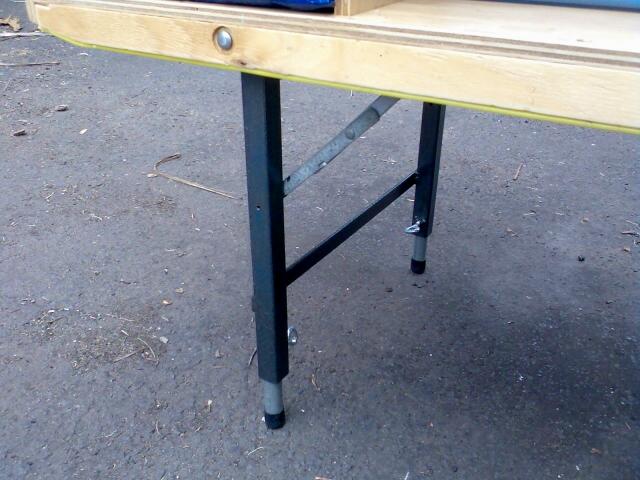
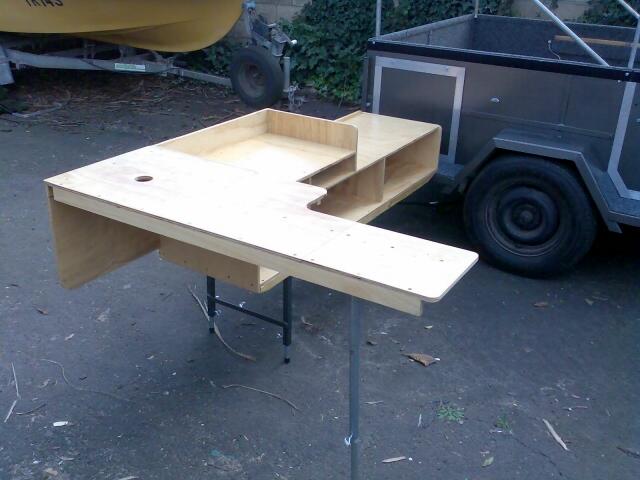
the kitchen
I used off cuts from the bed board and scrapped the old kitchen box
for the rest. Just a basic setup to take most of our cooking gear
and dry food. It slides out of the trailer on plastic strips
(actually “yellow tongue” used in chipboard flooring) screwed to the
bottom of 30mm high timber runners. The space underneath allows the
legs to fold up out of the way. A lip on the trailer end of the box
rests against a strip of aluminium angle riveted to the guard to
stop the box sliding off when pulled right out. The legs themselves
are made from 25mm square RHS with short pieces of tube (an old tent
pole) slid inside; tent pole “T nuts” make them adjustable for
differing ground levels. Folding stays from an old card table lock
the legs in place when lowered. When raised, the tubing parts of the
legs are held up with round spring steel clips (designed for tool
boards) screwed to the underside of the box.
Some more bench space would be good as the icebox takes up most of
right hand side and the return is a little on the small side. It
does all pack away neatly though - the return fits in behind the box
and rests against the tailgate.
|
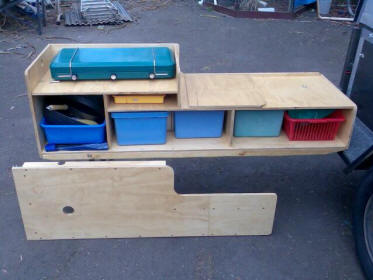
plenty of storage |
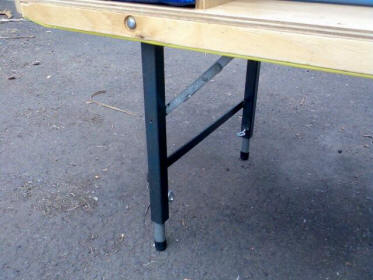
leg detail
|
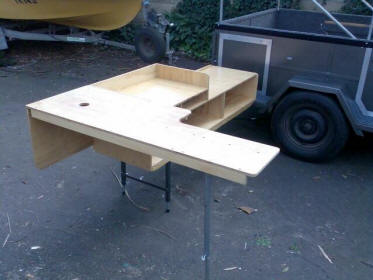
kitchen setup |
kitchen in
|
kitchen out
|
budget
icebox
I've mentioned our ice boxes a couple of
times. These aren't actually commercial units; rather, they are
simply recycled fridges. Working in the accommodation industry we
occasionally have to replace units that have failed (some of them
not so old either). Provided the door seals are still good, once
stripped out and the holes sealed up, they make very efficient ice
boxes. The smaller one is about 80L and is quite light. I attached
some handles so it can be carried.
The larger unit was a medium sized fridge; the main part is 150L
with another 45L in the freezer compartment. At present this one is
redundant as it no longer fits in the CT, however I think I’ll will
end up mounting it to the drawbar somehow and reclaim some space
inside the
camper trailer, just need to find a way of getting it off and on
easily.
lighting
& electrics
Pretty basic actually as our needs
are simple. Sorry, there is nothing about 12 volt fridges, solar
panels or big AGM batteries in this section.
It's possibly a legacy of being tent campers but we have never seen
the need for a real fridge, and while this may change in the future,
an efficient esky and a bag of ice will do us for now.
What I was looking forward to though was not having to cart around
gas lights, extension poles and extra gas bottles. Then there's the
exploding glass shades. And you would think they could come up with
a permanent mantle. All this hassle just to be able to see at night.
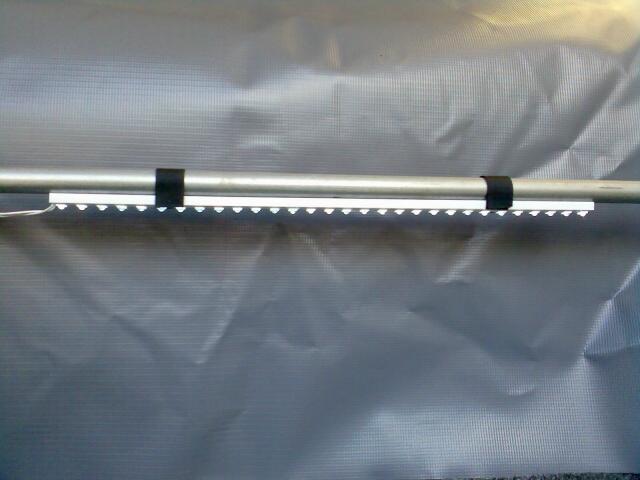
Enter the LED light! Lightweight, bright, and runs on the smell of
battery acid – it has to be a campers dream. OK, so maybe I'm
exaggerating somewhat but I like them.
Sticking with the budget theme I found some 12volt LED strips at DX
http://dealextreme.com 50cm long containing 30 bright LEDs, with
good reviews and at less than US$10 each had to be a bargain. With
an idea forming I also ordered a couple of cheap USB powered reading
lights.
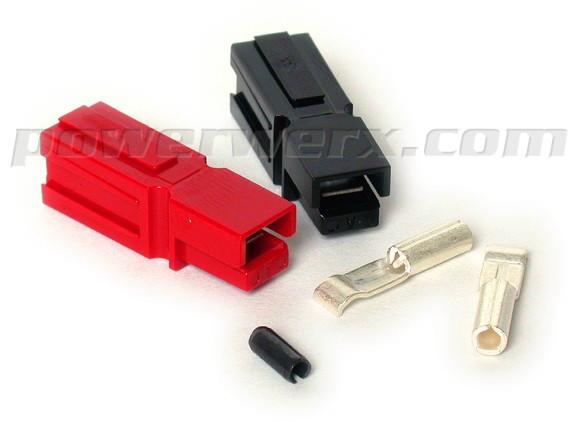
Thanks to a group member (sorry I don't remember their name) putting
up a post about where to obtain reasonably priced Anderson plugs I
ordered a bag of 15amp Powerpoles from PowerWerx
http://powerwerx.com in the US. These are great little plugs and even with
international freight costs, work out much cheaper than anything
else I could find here.
From the battery I ran the main power feed through a keyed isolation
switch (salvaged from a renovation job), allowing the power to be
switched on/off without removing the lid of the battery box to
disconnect a terminal. Via a 10 amp fuse the feed then goes into a
distribution block (sounds flash but is just a cheap plastic
terminal block). I split power feeds off for each lighting/power
circuit and also added a 7805 voltage regulator on one of them -
this was the 5v feed for the reading lights, or any other USB
powered device we may wish to plug in.
Using heavy twin I wired up the Powerpoles, one at the back of the
trailer for the kitchen, one under the single bed for an inside
light, and another in the front locker for the main annex light.
Also fitted was a 3 switch wall plate near the door to enable us to
switch the lights from in or outside the tent.
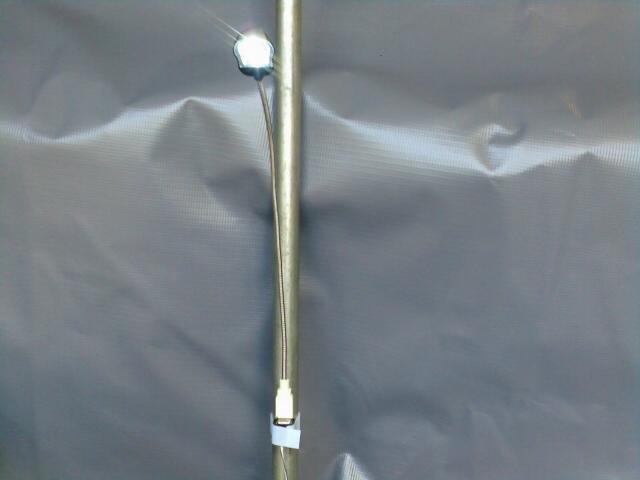
I bent up a small bracket and mounted the socket end of a USB
extension lead to the wall beside the single bed, then cut off the
male end, soldered on some thin twin lead and ran it back to the 5
volt feed on the distribution block. For the main bed lighting I
used a double USB socket removed from a dead computer motherboard,
but this time with a flying lead so it can rolled up and stowed away
when the tent is packed up. A Velcro strap holds it onto the bed bow
when in use.
When the order arrived from DX I wasted no time in wiring up the
lights. We are rather impressed with these LED strips; they produce
plenty of light and draw less than 200mA. With all the lights ablaze
the total current draw is only ½ an amp – I think the battery I'm
using (currently on loan from the boat) is overkill.
The USB lights aren't too bad for the price either, OK to read with
and good for finding your boots when nature calls in the middle of
night. One of them went rather dull the first time out though, not
sure if the light is a dud or the regulator is putting out a bit
more than required and has killed it, will have to check that out.
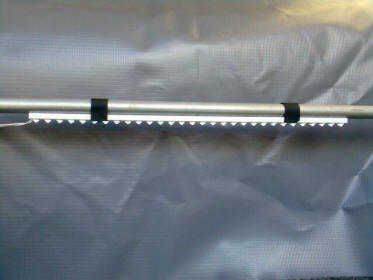
excellent value for money LED strip
|
USB reading light
|

Anderson PowerPoles |
front locker
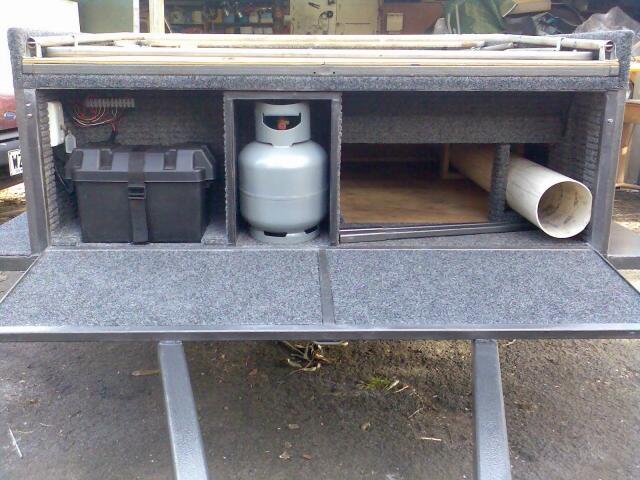
The forward area beneath the bed base makes an
ideal storage compartment. Rather than carry the gas bottle on the
guard as we’d done previously, I made up a separate box inside the
locker. When the front gate is raised, the box is sealed off from
the rest of the trailer (required by law). In the off-chance of a
leak, gas can escape through a vent in the floor.
Also housed in the locker is the battery and associated wiring. A
1500mm length of 150mm storm water pipe under the single bed holds
all the poles and spreader bars. There is plenty of room for a tool
box to hold pegs, ropes and spare bits & pieces. The bed support
bars live in here too.

storage locker |
so what
did it end up costing
After so many years the original
trailer owed us nothing so that cost was not factored in at the
start. My labour was free and as I did virtually all the work,
unless stated, all costs below are for materials only. As noted
throughout this document, I had lots of things already that were
used in the build - tent poles, timber, wire, second hand items,
etc. I didn't put a dollar figure on these but I guess if you had to
buy everything new it would easily add a few hundred to the total.
|
Trailer Mk1 |
| Steel |
$125 |
| Timber |
S175 |
|
Drawbar (incl. labour)
|
$250 |
| Mudguards (incl labour) |
$80 |
| Paint, sealant, screws, etc |
S45 |
|
TOTAL
|
$675 |
| |
|
tent, Bed base & trailer mods |
| Steel, Alloy strip
|
$60 |
| Timber |
$170 |
| Canvas |
$250 |
|
PVC
|
$100 |
| Velcro, zips, insect screening |
$220 |
|
Roof bow (incl. labour)
|
$20 |
| Marine carpet |
$50 |
|
Tent pole fittings, bungy cord
|
$20 |
|
Hardware – wheels, sealing strip, bolts & nuts, screws,
rivets
|
$80 |
| Paint, adhesives |
$50 |
|
Electrical/Lighting
|
$75 |
|
Spreader bars
|
$40 |
| TOTAL
|
$1125 |
| |
|
grand total |
$1800 |
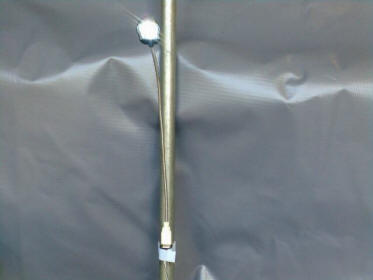
updates
I started writing this article
several months ago, just been a little slack in getting it finished
and posted up. Since completing the CT we have done a number of
successful trips away, naturally though, we pin pointed a few things
that would improve the experience.
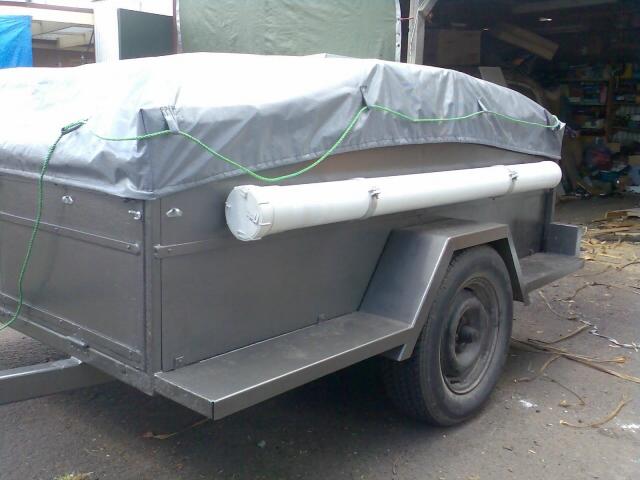
Because the tropical roof won’t fold down neatly with the
canvas, it has to be taken off and laid on one of the beds. Wet
pack-ups mean wrapping it in a tarp and hoping it doesn’t leak on
the way home. The roof rack from my old work van had a 90mm pipe
carrier bolted on the side. I shortened the pipe and mounted on the
side of the CT, the rolled up tropical roof fits snugly inside. I
had to buy a new screw-on cap – cost $6.00.
I’ve since moved the carrier to the rear of the trailer.
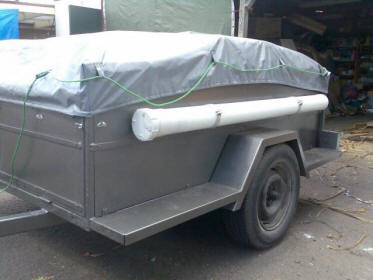
carrier for the tropical roof |
Maybe I’m getting old but I felt
that our good 100mm foam mattress wasn’t as comfortable as it used
to be. A near new DB inner-spring mattress from one of the spare
beds at home was pressed into service, what a difference it made to
our sleep!
This presented a problem though; normally, when setting up, the bed
base is pulled out and allowed to hang in mid-air while the support
legs are fitted. However the weight of the new mattress placed too
much strain on the sliding door wheels at the back of the bed base
causing the axles to bend. I replaced them with the same type of
wheels used on the bottom but this made for clearance issues with
the bows when sliding the bed in/out (which is why I hadn’t used
them originally). It took a bit of moving things around but is
working well now. Still an issue was the overhanging weight putting
an alarming bow in the bed base..
We’d been carting the trailer spare in the boot of the car as
I’d not made a carrier for it on the trailer. Time to kill 2 birds
with one stone.
Originally I was going to go the easy route and just have the spare
laying horizontal on the drawbar, standing it vertical though made a
natural support for the bed base when setting up. I had enough scrap
to make it up for zero cost.
I fitted some S/H wheels to the bottom of the big icebox so
it can be moved about (it’s rather heavy when full). I then made up
alloy runners (donated from the previously mentioned ladder rack)
that bolt across the drawbar. We can now roll on/off the fridge
without too much effort. Again, it was a no cost mod.
With the smaller ice box gone we can now fit a bit more into the
trailer.
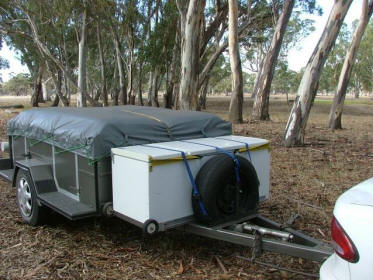
big ice box and vertical spare
|
Would I do it again? You bet. I had a ball designing and
building our camper – using it is the icing on the cake. I have lots
of ideas for a future project, so don’t be surprised if you see MkIII pop up one day.
thanks to Dirk for
sharing this idea
april 2009
|