The two 12 volt AGM deep cycle batteries in our camper trailer were
slowly dying, so this was the perfect opportunity for a LiFePO4
Lithium
battery upgrade. I had installed two Ritar 120 amp-hour AGM deep
cycle batteries in 2012 along with a
Redarc BCDC1225 DC to DC charger, then adding at a later
time an
Enerdrive Elite monitor for more precise
battery monitoring over a voltmeter.
Recently
I installed a
Redarc Smart
Battery Monitor that uses bluetooth
technology to view the battery charging, discharging & capacity via an app on our iPad
& iPhone. A bonus of this monitor is Carol can check the batteries state of
charge while we drive which also gives an estimate for the length of time until the
batteries are fully charged.
The Redarc BCDC1225 had proven itself in charging
our camper trailer batteries & with no problems encountered during
all this time. The DC to DC charging side puts out 25 amps in boost & has fully charged the camper
trailer batteries to 100% from the vehicles alternator as we drive
between camps & then via solar panels through the
inbuilt MPPT solar regulator when camped. Undercharging AGM batteries causes
sulphating which is a battery killer.
We had nine years service from the two Ritar 120 amp-hour AGM
batteries, no doubt thanks to the Redarc BCDC1225 3-stage charging, however in the end they were only
achieving 12.6 volts at rest. They were replaced by two PowerSonic
120amp-hour AGM batteries which after only four years are
reaching the same 12.6 volts at rest. Time to upgrade to LiFePO4
Lithium batteries.
voltage drop
Voltage drop is the biggest downfall when charging deep cycle
batteries in a camper trailer which are often at a distance of ten metres
or more from the vehicles alternator. To make matters worse
modern smart alternators are only designed to recharge the
starter battery & do not produce the correct voltage to fully
charge a deep cycle battery. A DC to DC charger overcomes both
these problems when using the recommended wire gauge for the
distance involved.
what is multistage charging?
The Redarc BCDC1225D
is a 3-stage DC to DC charger operating from the vehicles alternator & solar panels to
provide the best possible charging to fully charge a deep cycle battery.
boost mode maintains constant amps for a LiFePO4 Lithium
battery until it
reaches absorption voltage. The amps may vary in order to
maintain a safe operating battery temperature or to limit the
difference between input and output voltages.
absorption
mode maintains a constant voltage level for a
predetermined period of time or until the amps being drawn by
the output battery drops to less than 4amps for 30 seconds,
after which the charger will enter float stage.
Float mode
In LiFePO4 Lithium battery charge profile the charger will turn off,
but will move back into boost mode when the voltage drops to a
predetermined level. In AGM battery charge profile the voltage
is held at a preset level to keep
the battery fully charge without damage, preventing sulphation
which shortens the life of an AGM battery.
|
 |
|
LiFePO4
Lithium battery charging profile - volts & amps |
what is
mppt?
An MPPT solar regulator (Maximum Power Point Tracking),
regulates the voltage & amps output of a solar panel to
achieve the maximum power output needed to fully charge a 12 volt
battery at any given
point in time. During low light level situations
it will compensate for the low light & find the new point
at which the solar cell delivers its maximum power output.
why a lithium LiFePO4 battery charger
It is important a battery charger that is designed for LiFePO4
Lithium battery charging is used. The current must be terminated
when full charge is achieved as this battery type cannot absorb
overcharge. The correct charger will also ensure the battery is
charged safely & efficiently, therefore maximizing its lifespan
& performance. A LiFePO4 Lithium battery that has received a
fully saturated charge will keep the voltage elevated for longer
than one that has not received a saturation charge.
lithium
LiFePO4
battery upgrade
LiFePO4
stands for lithium iron phosphate, a type of rechargeable
lithium-ion battery:
Lithium (Li): The lithium component in the battery
Iron (Fe): The iron component in the battery
Phosphate (PO4): The phosphate component in the battery
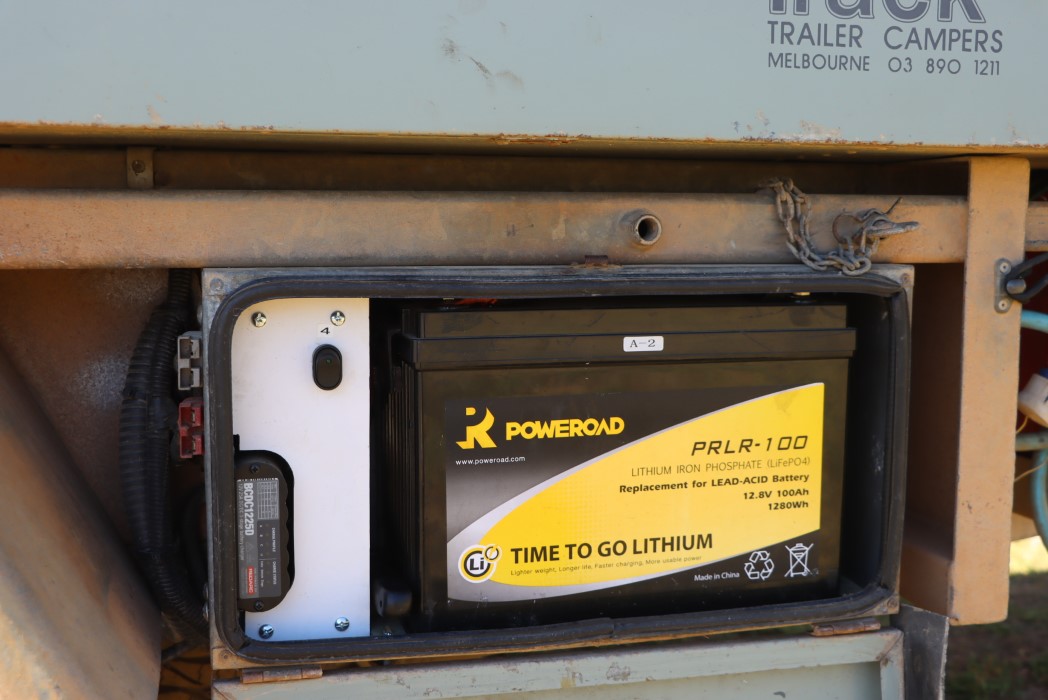
The price of quality LiFePO4 Lithium 12 volt batteries are now becoming more
affordable so this was a good opportunity to look at an upgrade
for our camper trailer. LiFePO4 Lithium batteries have some major
advantages over an AGM deep cycle battery. They weigh only half
that of an AGM which is a huge plus in a soft floor camper
trailer with minimum payload, they have a faster charge rate,
along with many
more battery cycles when shallow discharging. A cycle is a
discharge of the battery to whatever the depth & then fully
recharged. The deeper the discharge the less number of cycles. Be aware not all
LiFePO4 Lithium batteries are created equal,
so it is worth doing your research & not necessarily on the
battery manufacturers website when looking for the best cost & service
life to suit your own needs & budget.
Dimensions vary, however the 100 to 135 amp-hour range LiFePO4
Lithium are around the same
size as the 120 amp-hour AGM battery so are a direct swap into the same
space. Our Redarc
BCDC1225 is twelve years old & unfortunately does not have
the preferred
Lithium charging profile. After a faultless service a Redarc BCDC1225D upgrade was a no brainer.
redarc bcdc1225d
The Redarc code BCDC1225D stands for Battery Charger Direct
Current 12 volt 25 amp & D for solar 'green power priority'
technology. The 25 amp output is suitable for
a 75amp-hour to 200amp-hour size battery bank. A LiFePO4 Lithium battery
will except a higher charge rate than an AGM, therefore we could
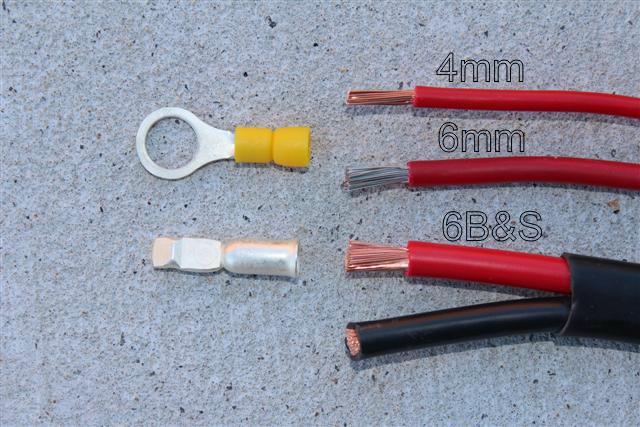
have use a BCDC1240D.
However a 40 amp charger would have meant an extra huge
expense & time removing all the 6B&S cable right from the
vehicles starter battery to the camper trailer batteries, plus
larger Andersons & rewiring with the Redarc recommended 4B&S
twin core sheathed cable at around
$30 a metre. The 25amp charger had already proven itself
suitable
charging the AGM batteries on drives between camps.
As a general rule of thumb
a LiFePO4 Lithium battery will accept a charge rate of 1C, that
is a 100 amp-hour battery will accept a 100 amp charge, whereas an AGM deep cycle battery will except a charge rate up to 0.3C,
that is a 100 amp AGM battery will except a charge rate of
30 amps.
Like the Redarc BCDC1225, the BCDC1225D is a 25 amp DC to DC
charger with input from the vehicles alternator as well as an
inbuilt MPPT solar regular to fully charge a deep cycle battery.
The D model now includes a Lithium charge profile along with its
own solar input connection cable. The BCDC1225 model had a shared alternator & solar input cable
needing a relay to switch to the roof mounted solar when the
engine was turned off.
The D will automatically switch to solar when the engine is
not running, perfect if you have solar panels on the roof. The solar input is priority
when driving unless the charger needs
more input to fully charge the batteries & will then bring in
the vehicles alternator.
The BCDC1225D will
also automatically limit the power input from solar if the solar
exceeds 375watt. Having additional solar panel wattage
is beneficial for battery charging in low light
levels such as a cloud day, early morning or late afternoon.
|
 |
|
Redarc BCDC1225D specs |
planning
The best way to start any
project on your camper trailer is to draw a diagram to give you
an idea of the materials, components or parts along with
the skills & tools needed. Even though this was a replacement job, extra cable, fuses, terminals, Anderson connectors,
ply, screws & bolts were needed.
If you are doing a DIY
wiring job, it is always a good idea
to have an auto electrician check your proposed
wiring diagram.
As I am replacing the
existing Redarc DC to DC charger with the latest model there was minimum
wiring required. The 100 amp-hour LiFePO4 Lithium batteries are of similar
dimensions, however I did take this
opportunity to change a few things.
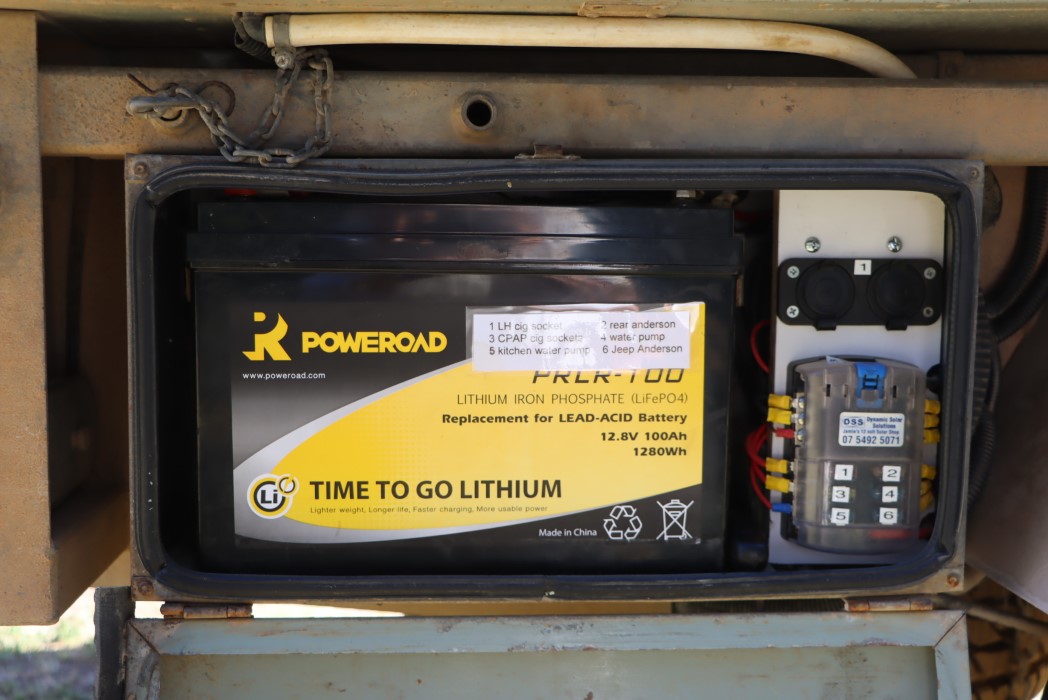
* There is a battery box each side of the trailer forward of the
axle. I had originally placed the AGM's in the boxes towards the axle end in a hope their 80kg combined weight
would have less impact on the ball weight. The two LiFePO4
Lithiums have
a total weight of 32kg, so I mounted them towards the coupling
end of the battery boxes which also gave me a better opportunity
for a neater wiring layout.
* While I had no
trouble from the automatic reset 40 amp fuse, however I decided to put
Midi fuse in their place as recommended by Redarc.
* There was no room for the Redarc smart battery monitor shunt
to be positioned on the panel next to the battery when I
installed it. There is a button on the shunt that needs to be
pressed as part of the pairing of the setup app & operating app.
Again there was no alternative but to mount the shunt behind the panel.
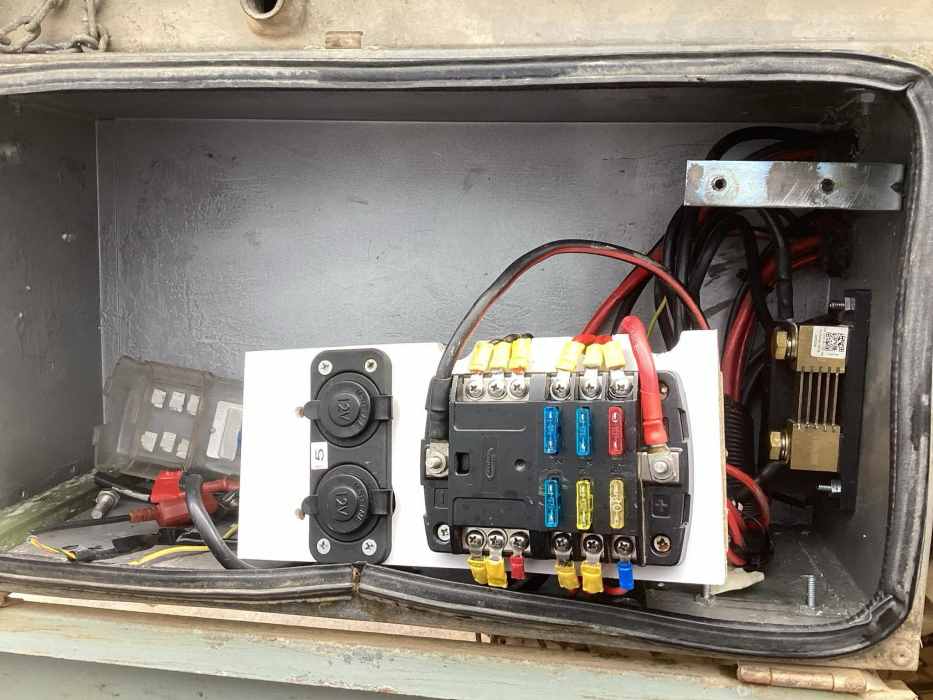
* I installed busbars near the positive & negative battery
terminals replacing the insulated studs making for a neater job
in the limited space.
wiring
The two 100 amp-hour
LiFePO4 Lithium batteries are wired in parallel, meaning the batteries
are wired positive to positive & negative to negative, making
them in essence one big 12 volt 200 amp-hour battery. With both
batteries being charged as one they should be of the same battery
type, capacity & age. The charger positive goes to the positive
terminal on one battery & the charger negative goes to the
negative terminal on the other battery. The Blue Sea fuse box is
also wired to the same terminals & has its own inbuilt negative busbar making for easy wiring runs to each of the 12 volt accessory
outlets.
All wiring was 6B&S twin core sheathed cable including that from
the vehicles alternator keeping within Redarc's instillation
guidelines, the connecting of batteries, from batteries to the
fuse box & from Anderson connectors to the Redarc charger.
6mm auto twin sheathed wire was used for all other wiring from the fusebox to
the accessory outlets & solar input leads from the solar panel
unregulated output to the Anderson connector.
Any 12volt connectors exposed to the elements are Anderson
connectors as the terminals are self cleaning when connecting.
All cigarette sockets & USB ports are inside the lockers of
the camper trailer.
Space was at a premium for wiring next to the batteries all the
while trying to keep the whole job as neat as I could. Four post
busbars were used on both the positive & negative connections
keeping the battery posts uncluttered. There is only one cable
from the Redarc smart battery monitor to the negative battery
terminal so all amps in & out are counted through the shunt.
component
sourcing
You will find a large varying price
range in sourcing quality 12 volt components, parts & wiring so
it is worth shopping around. Google is the best place to look.
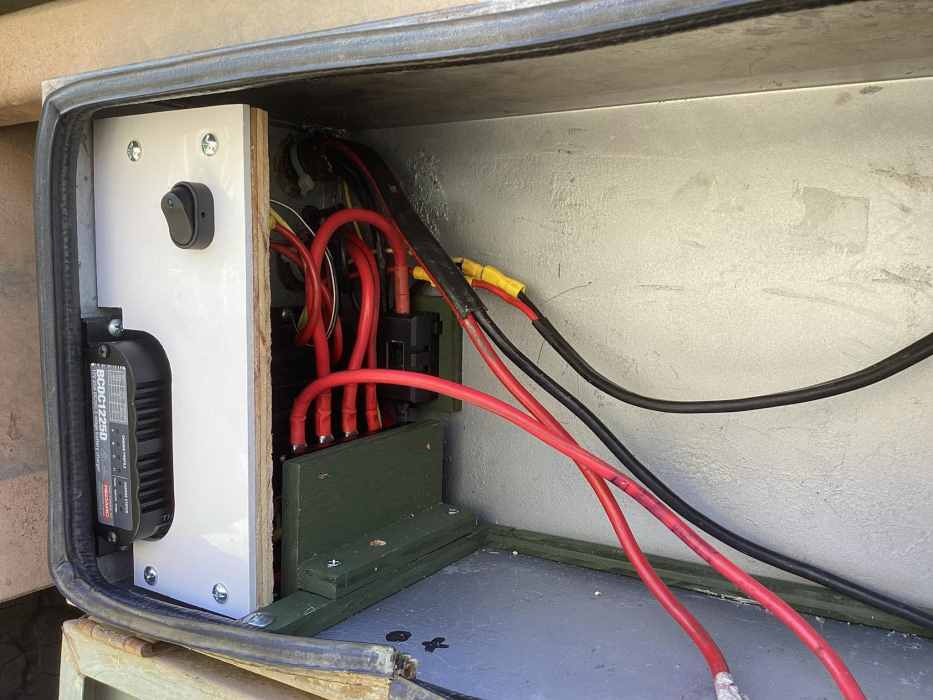
charger
input wiring
The wiring is fairly simple & straight forward.
Red cable is the charger input from the
vehicles alternator with a 40 amp fuse next to the starter
battery. There is an Anderson connector at the rear of the
vehicle.
Yellow cable is the charger input from the
unregulated solar panel.
Brown
cable is connected to the positive battery terminal
with a 40 amp fuse next to the terminal.
Black cable is connected to the
negative busbar.
Blue wire is left unconnected for a
standard alternator input for our alternator type.
Green & Orange wires are connected
together to set the charge output for Lithium battery charging
profile.
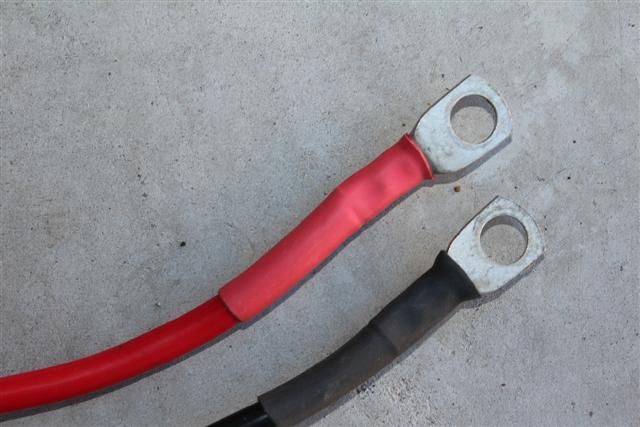
All uninsulated terminals were crimped & shrink wrapped. The
connections to & from the BCDC1225D charger cables where
crimped, soldered & shrink wrapped as per the Redarc
instillation instructions.
|
 |
|
BCDC1225D
lithium battery wiring diagram |
battery & alternator profile blue wire
Battery
profile The BCDC1225D can be used for charging a range of
12 volt batteries including automotive lead acid, calcium, Gel, AGM, SLI, deep cycle or Lithium. The charging profile is selected depending on how the battery profile
wires are configured. I am using LiFePO4 Lithium batteries therefore the orange
& green wires are connected together.
Starter battery type triggers the
chargers on & off voltage. Our vehicle has a standard alternator so the blue wire is
left unconnected or it can be earthed. For a standard alternator
the charger will turn on at 12.9 volts when the vehicle is
started.
If a vehicle has a smart alternator the blue wire
is connected to the vehicles ignition via a fuse. For a smart alternator the charger will turn on at 12.0 volts
when the vehicle is started.
The BCDC1225D is also designed to isolate the vehicles starter battery from
the auxiliary battery when the vehicle is turned off.
display
panel
The front panel features
seven LEDs that display the battery set charge profile and also
the charge status.
Charge
profile LED will be solid on the battery type selected
when the unit is operating and charging. A flashing profile LED
indicates that the unit is in standby mode and not charging. In
my case the Li LED is lit.
Charge
status LED indicates the input is from solar or the
vehicle alternator. When the solar &
vehicle LEDs are on at the same time it indicates both input
sources are available & in use. The dual input uses 'green power
priority' technology to supply as much power as possible from
the solar before adding input from the vehicles alternator to
gain maximum output to fully charge the battery.
Stage LED indicates the charge mode by the sequence below.
I have printed this off to remind me of the
flash code